Single Sign-on (SSO) is a one-step user authentication process. If you are the admin of a HelpDesk account, you can set up SSO with the identity providers (IdP) of your choice. Your technicians can access HelpDesk using the IdP credentials without another password to manage.
Admin of a HelpDesk account can configure SSO to access HelpDesk by signing in to a central identity provider. To set up SSO, you need to first configure your identity provider and then configure your HelpDesk account.
To configure SSO for your HelpDesk account,
- Login to HelpDesk via web browser.
- Cliquez sur le nom d'utilisateur affiché dans le coin supérieur droit et cliquez sur "Mon compte".
- Cliquez sur "Single Sign-On".
- Entrez un nom pour votre profil SSO.
- Saisissez les URL et ajoutez le certificat X.509 reçu de votre IdP.
Remarque : les certificats X.509 doivent être au format .pem ou .cer. - Cliquez sur "Configurer l'authentification unique".
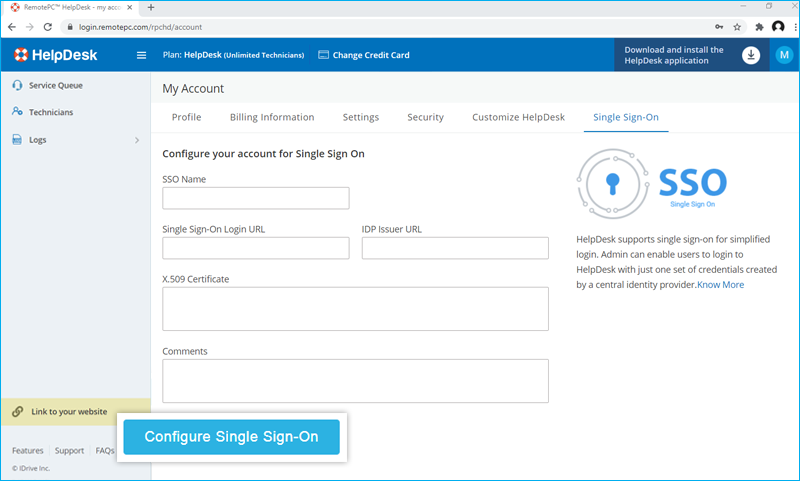
Vous recevrez un courriel lorsque le SSO sera activé.
Admin of HelpDesk accounts can either select SSO for login while inviting technicians to create an account or enable SSO for existing technicians.
To invite technicians to use SSO,
- Log in to HelpDesk via web browser.
- Go to the 'Technicians' tab and click 'Add'.
- Enter the email address in the 'Email Address' field.
- Select group and other preferences for the technician.
- Sélectionnez "Enable SSO".
Note: If you select the checkbox, technicians won't have to set a password for their account.
- Cliquez sur "Inviter".
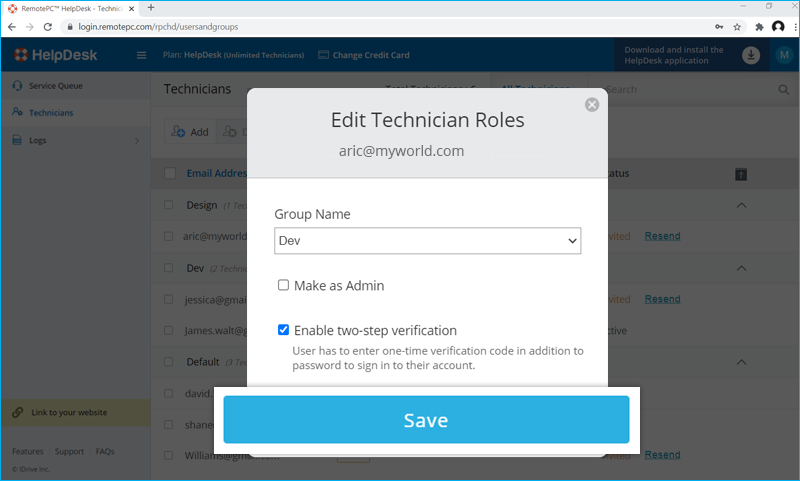
To enable SSO for existing technicians,
- Login to HelpDesk via web browser and go to the 'Technicians' tab.
- Hover on the technician you want to edit and click
 .
. - Sélectionnez "Enable SSO".
- Cliquez sur "Enregistrer".
Oui, les administrateurs peuvent supprimer un profil SSO de leur compte.
Pour supprimer le profil SSO,
- Login to HelpDesk via web browser.
- Cliquez sur le nom d'utilisateur affiché dans le coin supérieur droit et cliquez sur "Mon compte".
- Cliquez sur "Single Sign-On".
- Cliquez sur
 correspondant au profil SSO que vous souhaitez supprimer.
 - Click'Delete' in the confirmation popup to remove the SSO profile.
Deleting the SSO profile will remove Single Sign-On for all technicians linked with this profile and they will have to use their registered email and password for login.
To disable SSO for a technician,
- Login to HelpDesk via web browser and go to the 'Technicians' tab.
- Hover on the technician you want to edit and click .
- Désélectionnez la case "Activer le SSO".
- Cliquez sur "Enregistrer".
Si vous désactivez l'authentification unique pour un utilisateur, celui-ci devra définir un nouveau mot de passe pour son compte. Une fois cette opération effectuée, l'utilisateur doit utiliser son adresse électronique et son nouveau mot de passe pour se connecter.
Oui, vous pouvez configurer votre propre fournisseur d'identité pour le SSO avec un ensemble de paramètres décrits ci-dessous :
- HelpDesk uses SAML2 with the HTTP Redirect binding for HelpDesk to IdP and expects the HTTP Post binding for IdP to HelpDesk.
- Lors de la configuration avec SAML, utilisez les URL suivantes et enregistrez les modifications.
- Single sign on URL:
https://www.remotepc.com/rpchd/sso/process - Audience URL (SP Entity ID):
https://www.remotepc.com/rpchd/sso/metadata
- Single sign on URL:
- Votre fournisseur d'identité peut vous demander si vous souhaitez signer l'assertion SAML, la réponse SAML ou les deux.
To login in to SSO enabled account via desktop,
- Cliquez sur "Single Sign-On (SSO)" sur l'écran de connexion.
- Enter 'Email Address' and click 'Login'. You will be redirected to IdP web login page.
- Saisir le nom d'utilisateur et le mot de passe enregistrés auprès de l'IdP, lorsqu'il est demandé de saisir les informations d'identification.
Upon successful validation of identity, you will be prompted to go back to the desktop application and you can now continue using your HelpDesk account.
Pour se connecter à un compte compatible SSO via le bureau,
- Cliquez sur "Single Sign-On (SSO)" sur l'écran de connexion.
- Saisissez l'adresse électronique et cliquez sur "Connexion". Vous serez redirigé vers la page de connexion de l'IdP.
- Saisir le nom d'utilisateur et le mot de passe enregistrés auprès de l'IdP, lorsqu'il est demandé de saisir les informations d'identification.
Upon successful validation of user identity, you will be prompted to go back to the desktop application and you can now continue using your HelpDesk account.